Get Started With Toast Catering & Events
Last updated: Jun 25, 2026, 11:12 AM
- Toast Catering & Events Overview
- Before You Begin
- Step 1: Create an Order Type (BEO)
- Step 2: Import a Customer List (Optional)
- Step 3: Capture Leads and Convert Them to Orders
- Step 4: Create a Catering Order
- Step 5: Send an Estimate
- Step 6: Send an Invoice and Collect a Deposit
- Step 7: Print Prep Tools for the Kitchen and Staff
- What's Next
- Related Articles
- Terms of Use
Toast Catering & Events Overview
With Toast Catering & Events, you manage every step of a catering or events order in one place: from the first lead form to the final paid invoice. You can:
- Build Banquet Event Orders (BEOs) for every occasion
- Customize Kitchen Sheets so the kitchen only sees what they need
- Create Estimates your guests can approve online
- Track upcoming events on your Calendar View, and Sync With Google Calendar
- Use Menu Integration with your existing Toast menus, open items, and discounts
Toast Catering & Events Pro adds EventView (a unified, branded guest page), Discussions, Tasks, Automations, and Event Areas to prevent double-bookings.
Note: Toast Catering & Events is not currently available in Australia. Check back soon for updates.
Looking for a live training experience with a Toast Training Expert? Sign up for a live Toast Classroom session to walk through setup with someone from Toast.
Before You Begin
Applies to: Toast Web, Toast Catering & Events, Toast Catering & Events Pro
Permissions needed:
- Access to Toast Web with Restaurant Admin and Web Setup permissions, along with the following:
- 4.5 Edit Full Menu
- 4.16 View Invoicing, Catering & Events
- 4.17 Edit Invoicing, Catering & Events
- 4.18 Configure Invoicing, Catering & Events
What you'll accomplish: Configure your first order type (BEO), import your customer list, create a catering order, send an estimate and invoice, collect a deposit, and print prep tools for your kitchen and staff.
Before you configure your Toast Catering & Events settings, set up the following in Toast Web:
- Catering service charges (for example, delivery fees or labor fees). See Customize Service Charges and Mandatory Gratuity.
- A catering or catering-online-ordering revenue center. See Create and Assign Revenue Centers.
- The maximum number of days an order can be placed in the future is set in the UI options page. See Schedule Future Orders.
To open Toast Catering & Events, log in to Toast Web and select Catering & Events from the left-hand navigation menu. If you do not see Catering & Events in your left-hand navigation, Toast Catering & Events may not yet be on your account — see Get Help With Toast Catering & Events or contact Customer Care to confirm.
Step 1: Create an Order Type (BEO)
Before you create your first catering order in Toast, configure at least one order type — also called a Banquet Event Order (BEO) template. An order type defines the information you collect from guests for a particular kind of event. You can create multiple order types (for example, "Catering Drop-Off," "On-Site Event," or "Holiday Buffet") and edit each one at any time.
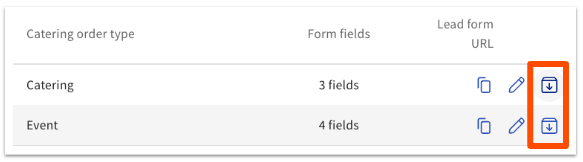
- In Toast Web, navigate to Catering & Events > Settings. All previously created order types (BEO forms) are saved here.
- Select Add order type.
- Choose the order type to add: Catering (guest count, utensils, notes), Event (event space, guest count, occasion, notes), or Custom. You can always go back and edit individual settings on each order type later.
- Name the order type and select your General settings. For restaurants using Toast Multilocation Management (MLM), you can select specific target locations for this order type.
Note: The Default dining option you select here can affect the wording on your BEOs. To show a delivery address field, for example, choose a dining option with the Delivery behavior applied. To learn more, see Set Up Custom Dining Options.
- In the Form fields section, add the fields you want to collect about this order type. You can add an existing field from another order type or create a new one. Each field has these options:
- Field name — what appears on the BEO
- Type — text input, yes/no, multi-line text input, employee, time, or select (select requires you to add options)
- Required — whether this field must be filled out
- Priority — appears at the top of the BEO form in larger text
- Internal use — does not appear on emails sent to guests
Note: Mark a field as Internal use when you want details that only your team sees — for example, kitchen-only prep notes or a delivery contact. Internal-use fields stay off guest-facing emails and the EventView page.
- (Lead forms only) Select the Lead form tab inside Form fields for extra controls. Here you can:
- Show all non-internal BEO fields on your lead form
- Require a customer to select a time
- Allow customers to upload an image
Note: When a guest submits a lead form, and you convert that lead to an order, the lead form's responses do not automatically copy into the order's Details fields — you'll re-enter event details on the order. This is current product behavior, not a bug.
- In the Contract section, add Default contract terms that apply to every order using this order type. You can also add attachments — for example, your cancellation policy — that are included in the order email.
Note: Default contract terms can be overwritten on an individual catering order if you need to make changes for one event.
- Configure your Notifications. This sends emails to specific employees at different stages of the process.
- Select Save in the top-right corner.
Expected outcome: Your new order type appears in Catering & Events > Settings. You can select it the next time you create a catering order.
If you no longer need an order type, select the archive button from the settings list to remove it from your order types list.
Add Production Items to an Order Type (BEO)
Production items automatically populate on your BEO and prep sheets if they are connected to your menu items. To learn how to create production items and attach them to menu items, see Production Items for Catering & Events.
Step 2: Import a Customer List (Optional)
If you are transitioning from another catering or events solution, you can move your existing customer data into Toast. Skip this step if you do not need to import customers.
- In Toast Web, navigate to Catering & Events > Customers.
- In the top-right corner, select Import customers.
- Select the Download template to get the required template for your customer list.
- Format your customer information in the spreadsheet and export it as a CSV file.
- In Toast Web, select + Upload file or drag and drop your file.
- Confirm the file you uploaded, and check Yes, I agree to upload this file.
- Select Submit.
Expected outcome: Your imported customers appear on the Customers page in the Catering & events module in Toast Web.
Step 3: Capture Leads and Convert Them to Orders
Toast Catering & Events leads let you collect potential guest information from a web form, and then convert those leads into catering orders inside Toast Web.
For the full setup — including how to share your lead form URL, embed the form on your website, and convert a lead to an order — see Create and Manage Leads With Toast Catering & Events.
Note: When you convert a lead to an order, the lead form's information does not transfer to the order's Details fields. You will re-enter the event details on the order.
Step 4: Create a Catering Order
Once you have at least one order type set up, you can build your first catering order.
- In Toast Web, navigate to Catering & Events > Orders. This page lists all previously created catering orders and their status.
- Select Create order.
- Select a catering order type. The available options come from the order types you created in Step 1.
- Enter the name of the customer placing the order. If you have already created and saved the guest in Toast Web, the name auto-populates as you type. For a first-time guest, select + Create customer, fill out their information, and select Save.
- Edit your Event details. You'll see the fields you configured on this order type in Step 1.
- Finalize your Order details. You can add:
- Dining options — see Set Up Custom Dining Options
- Prep times — how long before the Promised Date the kitchen needs to start preparing the order
- Menu items — you can add items from any of your menus, regardless of their visibility
- Discounts — see Get Started With Discounts
- Service charges — see Customize Service Charges and Mandatory Gratuity
Important: Ready Time on a BEO is the time the order is sent to the kitchen — also called the fire time — not the time the food will be ready for the guest. To change when the order fires, edit the Prep time.
- To move an order from draft to confirmed, do one of the following:
Expected outcome: The catering order appears on your Catering & Events > Orders list in draft state, ready for you to send an estimate or invoice.
Note: You can edit the promised date, prep time, and delivery information on any open or paid order. Select the order from the Catering orders list and make your changes. A confirmation message appears at the top of the page when changes are saved. Updates also reflect on the POS and on the invoice.
Important: Toast may fire scheduled catering orders to the kitchen at the time of order creation if the Send scheduled orders to the kitchen when created option is enabled at Takeout & Delivery > Availability > Scheduled Orders. This setting applies to every scheduled order, not just catering. Once an order has fired, the date is locked, and you cannot move it from the BEO. If you need to reschedule a future order that has already fired, do it from the POS at Mode > Pending Orders > Future Checks > Reschedule.
Step 5: Send an Estimate
Use the Toast Catering & Events module to send guests an estimate for their event.
- Open the guest's order and review the Estimate & contract section.
- (Optional) Select Add contract terms, Require signature, or Add attachments. Requiring a signature adds a line for the guest to type their name to confirm the estimate.
- Select the Actions drop-down at the top of the order page, then select Create estimate.
- (Optional) Select Review estimate at the top of the order to preview the email the guest will receive. The preview includes your restaurant's branding, order details, and the menu items in the order. If your restaurant uses Toast Catering & Events Pro, you'll also see the EventView preview, where you can share all event details, estimates, and payments with the guest on one unified, branded page.
- Once everything looks correct, select Send estimate.
Expected outcome: The order moves to your Catering orders page with a purple TENTATIVE status. If you require a signature, the guest is asked to sign (type) their name at the bottom of the estimate.

Confirm an Estimate
Once the estimate is sent, the guest receives the email within about one minute. If a guest tells you they are ready to approve the estimate, you can manually change the order's status:
- Select the order's purple TENTATIVE status.
- On the next page, select the status at the top and change it to Confirmed.
Note: Manually setting an estimate to Confirmed means the guest no longer needs to sign or confirm the estimate themselves.
Step 6: Send an Invoice and Collect a Deposit
After an estimate is confirmed, send an invoice to collect payment. You can send an invoice for a deposit first and capture the rest of the payment later, or you can send the full invoice upfront.
Note: Invoices in Toast Catering & Events are sent manually. They cannot be scheduled. You can configure automated follow-up messages if a deposit's due date has passed — see Adjust Your Invoice Settings.
Important: Toast Catering & Events invoices are different from invoices created with Toast Invoicing, which is a separate Toast product accessed from Payments > Customer invoices. If you are sending an invoice for a catering or event order, stay in Catering & Events > Orders. If you are sending a non-catering invoice (for example, charging a customer for goods or services outside an event), use Toast Invoicing — see Send an Invoice to Your Guests.
If you'll take payments via invoice, Toast recommends using the default nightly auto-capture (4 a.m. ET) to make sure invoice payments are captured for future orders. If you need to re-enable nightly auto-capture, contact Customer Care.
Collect a Deposit
For the full deposit walkthrough — including how to set the deposit amount, send reminders, create an open item for deposits, and report on deposits — see Manage Deposits With Toast Catering & Events.
Quick path:
- In Toast Web, navigate to Catering & events > Orders and select a blue CONFIRMED order.
- Select the Actions drop-down at the top of the page, then select Create invoice. The order becomes an invoice with its own unique invoice number, accessible from the Invoices tab.
- On the invoice's Payment schedule section, select + Add deposit request.
- Enter the Amount (dollar amount or percentage) and a Due date.
- Select Review deposit in the top-right corner to preview the email the guest will receive.
- Select Send deposit.
Note: You can edit the deposit amount until the deposit is paid (for example, if the headcount changes). After editing, you can send the guest an updated invoice email.
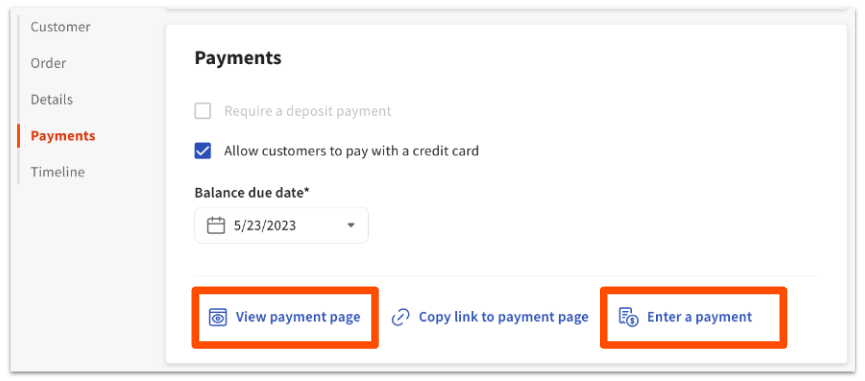
The guest can pay the deposit with a credit card directly from the email. To see what the guest sees, open the invoice and select View payment page from the Payment schedule section. If the guest pays by check or another method, select Enter a payment to record it manually.
When the deposit is paid, the invoice status changes to PAID, and the payment appears on the invoice's Payment schedule section.
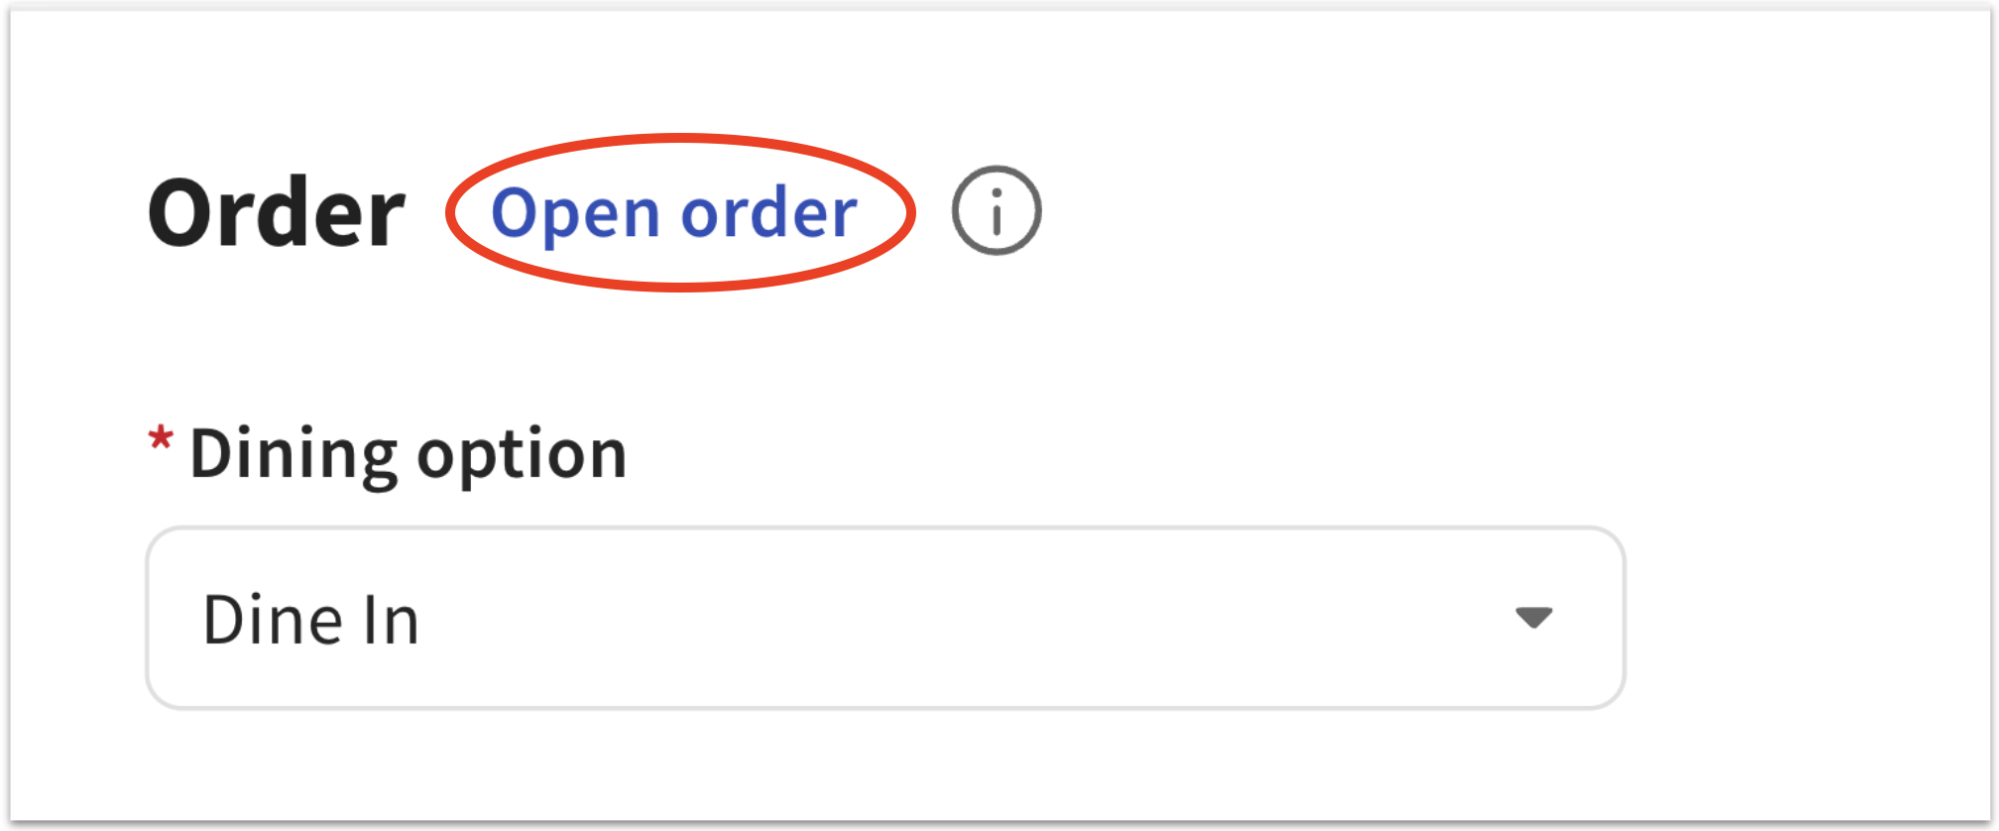
Note: If you do not need to send an invoice but still want the order to appear on the POS, select Open order instead of sending an invoice.
Send a Final Invoice
When it's time to send the final invoice — after collecting a deposit or right after a guest confirms the estimate:
- Select a CONFIRMED order from your Orders list at Catering & events > Orders.
- Select View Invoice in the top-right corner.
- Confirm the invoice details, then select Send invoice in the top-right corner. You can also send the invoice by SMS from the drop-down selection.
Expected outcome: Once the final amount is paid, the order shows a green PAID status on your Invoices page. Invoices that are not paid on time show a red PAST DUE status. For a past-due invoice, select it and choose Send reminder in the top-right corner.
Step 7: Print Prep Tools for the Kitchen and Staff
Toast Catering & Events includes Prep tools — customized PDFs and CSVs you can print or download for your kitchen, packers, drivers, and front-of-house staff. Available prep tools include prep lists, invoices, BEOs, kitchen sheets, pickup summaries, delivery summaries, pack sheets, order summaries, CSV exports, and labels.
For the full list of prep tools, the available filters for each one, and step-by-step download instructions, see Access and Download Prep Tools for Catering & Events Orders.
Quick path: in Toast Web, navigate to Catering & Events > Prep tools. Select an existing Standard prep tool, or select Create prep tool to build your own.
Note: Item descriptions, contract terms, and gratuity totals don't appear on a downloaded BEO by default. Each is controlled by a separate setting. To include Item Descriptions on the BEO, navigate to Catering & Events > Settings > Order & Invoice Settings, and toggle "Include item description" on. If a field that should appear on your BEO is missing, see Get Help With Toast Catering & Events for troubleshooting.
What's Next
Once your first event is on the calendar, these articles cover the most common next questions:
- Use advanced Toast Catering & Events features — see Optimize Toast Catering & Events for the Calendar view, Google Calendar sync, automatic invoice reminders, and 3rd-party delivery setup.
- Run events on the POS — see Manage Toast Catering & Events on Your POS for consumption events, tableside flows, KDS, and Orders Hub.
- Refund or void an order — see Refund or Void Toast Catering & Events Orders.
- Understand Toast Catering & Events reports — see Toast Catering and Events Reporting Overview. The Sales Summary report includes Toast Catering & Events sales — for invoice-specific reporting nuances, see Reporting for Toast Invoicing.
- Set up Catering Online Ordering — Catering Online Ordering is a separate add-on. See Get Started With Catering Online Ordering.
- Troubleshoot a Toast Catering & Events question — see Get Help With Toast Catering & Events for the full FAQ and troubleshooting library.
Related Articles
- Get Help With Toast Catering & Events
- Optimize Toast Catering & Events
- Manage Deposits With Toast Catering & Events
- Create and Manage Leads With Toast Catering & Events
- Access and Download Prep Tools for Catering & Events Orders
- Toast Catering and Events Reporting Overview
- Get Started With Catering Online Ordering
- Manage Toast Catering & Events on Your POS
Terms of Use
TERMS OF USE: Your use of this feature (and all Toast Services) is subject to the Toast Merchant Agreement. Capitalized terms used but not defined herein shall have the meaning set forth in the Merchant Agreement. Information you submit using this feature, including without limitation the terms of any contract you submit, shall be treated as Merchant Data.
Toast makes no guarantees, representations, or warranties whatsoever in connection with this feature, including without limitation that use of the Contracts feature and signature tool will result in a legally binding contract. Toast has no involvement in any agreement between you and any of your Customers, and is solely a service provider with respect to this feature.
You are solely responsible for saving copies of your contracts and distributing fully executed copies to your Customers. You will indemnify, defend, and hold harmless Toast from any claims arising from or related to your use of this feature and/or the content submitted by you and/or your Customers, as applicable, in connection with this feature including any claims regarding the enforceability of the contracts generated using the feature.
TOAST DISCLAIMS ALL LIABILITY RELATED TO ANY MERCHANT DATA. YOU ARE SOLELY RESPONSIBLE FOR ANY DAMAGE(S) RELATED TO MERCHANT DATA AND/OR YOUR USE OF THIS FEATURE.
IMPORTANT: Toast makes no guarantees, representations, or warranties whatsoever in connection with this feature, including without limitation that the contracts feature and signature tool will result in a legally binding contract. Toast has no involvement in any agreement between you and any of your customers, and is solely a service provider with respect to this feature. You are solely responsible for your use of this feature, including without limitation for (1) any content that you submit or generate using this feature, (2) verifying the identity of the signing party, (3) saving copies of your contracts, and (4) distributing copies of fully executed contracts to your customers. Your use of this feature is subject to the Terms of Use.