Toast Payroll:开始进行入职和实施
上次更新时间:2026年6月26日 15:34
在Toast Payroll中设置您的公司——创建您的登录,完成实施仪表板,并完成工资设置清单以运行您的第一次工资。
- Toast Payroll 入职概述
- 开始之前
- 步骤 1:创建您的 Toast Payroll 登录
- 步骤 2:完成实施仪表板
- 步骤 3:完成工资设置清单
- 步骤 4:注册 Toast 课堂
- 步骤 5:设置后该做什么
Toast Payroll 入职概述
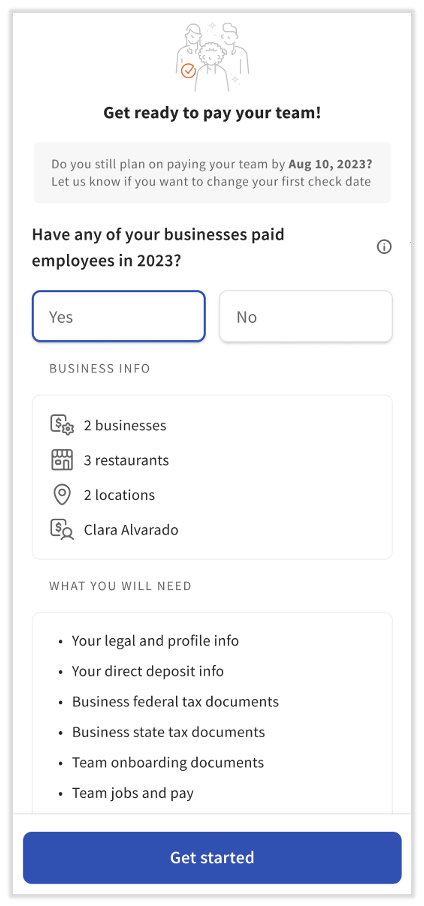
Toast Payroll 入职是将您的公司设置在 Toast Payroll 中,以便您可以运行第一次工资的过程。作为新客户,您只需完成一次,并在入职顾问的帮助下进行。
入职主要分为三个部分:创建您的登录,完成实施仪表板(在此输入您的公司、税务、地点和薪资信息),以及完成工资设置清单(在此完成您的个人资料,设置税务和薪资,并添加您的团队)。本文涵盖了所有三个方面,以及培训选项和上线后的操作。
有关常见设置问题的答案,请阅读Toast Payroll:入职和设置常见问题。
开始之前
适用范围:Toast Payroll
所需权限:
- 您必须是餐厅所有者或工资管理员。此人使用欢迎电子邮件登录Toast Payroll。
您将完成的内容:一个完全配置的Toast Payroll账户,包含您的公司、税务、地点、薪资和员工信息,准备好进行第一次工资发放。
为了减少完成公司设置所需的时间,请在开始之前准备以下信息:
- 公司代码:您创建的代码,用于标记您的Toast Payroll数据库。选择一个广泛且易于记忆的名称。它必须是一个没有空格或特殊字符的单词。
- 税务账户详情:您的联邦雇主识别号码(FEIN)和州税务账户号码。要注册或查找您的州税务账户号码,请阅读Toast Payroll:注册州税务账户。
- 注意:如果您在完成实施仪表板时没有州税账户号码,请在收到后尽快在Toast Payroll中输入,以避免税务申报的复杂性。有关说明,请阅读Toast Payroll:获取税务账户帮助。
- 企业法定名称:您公司在国税局注册的名称。
- 职位:员工用于打卡的职位,例如经理、服务员或洗碗工。
- 工资支付频率:您支付员工的频率(每周、每两周、半月或每月)。
- 建议的首次支票日期:您的员工将从您的首次工资提交中获得支付的时间。
- 银行账户信息:您将用于支付员工和资助其他工资成本的银行账户。
步骤 1:创建您的Toast Payroll登录。
设置您的登录是第一步。作为您Toast Payroll数据库的第一个用户,您在此创建的账户会自动链接到Toast Web,因此您可以使用相同的电子邮件和密码登录两个系统。
- 打开您的电子邮件收件箱,找到标题为“欢迎加入Toast Payroll大家庭”的电子邮件。
- 选择电子邮件底部附近的注册链接。仅选择一次以避免创建多个个人资料。
- 在 Toast Payroll 中创建一个密码。再次输入以确认,然后选择 注册。
- 在登录页面,输入您的电子邮件地址和密码,然后选择 下一步。
- 如果系统要求您输入公司代码,请在第 1 步的欢迎电子邮件中查找。
- 登录后,您将进入实施仪表板。
预期结果:您已登录 Toast Payroll,并查看实施仪表板。
第 2 步:完成实施仪表板
实施仪表板是您输入公司初始信息的地方。快速而准确地输入信息是尽快运行第一次工资单的关键。仪表板有三个里程碑:税务信息、地点和职位,以及工资单。
注意:完成此步骤的人必须是所有者或工资管理员。此人就是在第 1 步中登录 Toast Payroll 的人。
要打开实施仪表板,请导航到 payroll.toasttab.com 并使用您在第 1 步中创建的登录信息登录。如果您是从第 1 步继续,您已经在那里。查看三个里程碑及其要求,然后在准备好时选择 开始第一步。
里程碑 1:税务信息
- 确认或编辑您的公司代码。您的公司代码是您在Toast Payroll中的数据库名称。还请指明您是否在当前年度通过之前的薪资提供商支付了员工工资。选择 保存并继续。
- 确认您的公司使用了多少个FEIN,然后选择 保存并继续。
- 输入每个FEIN的详细信息,然后选择 保存并继续。
- 阅读蓝色框中的信息,确认您有多少个州税账户,然后选择 保存并继续。
- 输入每个州税账户的详细信息,然后选择 保存并继续。
- 选择 下一个里程碑 以继续。
预期结果:您的公司代码、FEIN详细信息和州税账户已保存,里程碑1已完成。
里程碑2:地点和工作
- 命名您的FEIN或FEINs,然后选择 保存并继续。
- 添加您账户的地点。这些可以是地址缩写、城镇的一部分、不同的城市或您选择的任何标签。为您添加的每个地点选择 保存地点,然后选择 保存并继续。
- 通过选择相应的气泡将每个地点与公司匹配。任何显示“请分配公司”的地点仍需匹配。选择 保存并继续。
- 通过为每个地点选择 编辑 添加地址,然后选择 继续。
- 在每个地点添加您雇用的职位名称,例如经理、服务员或洗碗工。选择 + 添加职位 以添加超过三个职位。尽可能多地添加;在实施仪表板完成后,您可以再添加更多。选择 保存并继续。
- 检查每个地点的职位是否准确,然后选择 保存并继续。
预期结果:您的 FEIN 名称、地点、地址和职位已保存,里程碑 2 已完成。
里程碑 3:工资单
- 设置您的支付组。支付组通常是一组在同一天和相同频率下支付的员工,但您可以以不同方式使用支付组。选择您想要的支付组数量,每个 FEIN 至少一个,命名它们,将每个分配给一个 FEIN,然后选择 保存并继续。要了解更多信息,请阅读 Toast 工资单:查看支付组。
- 为每个支付组选择您的工资单偏好:
- 银行假期设置决定在联邦银行假期的支票日期是否在假期之前或之后移动。
- 支付(支票)频率是您运行工资单的频率以及您的员工获得支付的频率。
- 工作周开始日期告诉 Toast 工资单何时开始计算每周员工的加班小时。这是一个基于从 Toast Web 接收的时间条目的全局设置。
- 注意:工作周开始日期在 Toast Web 中也作为一个设置存在。将两者匹配,以便在两个系统中报告相同。如果工作周的开始日期在Toast Web和Toast Payroll之间不一致,您可能会看到加班计算和劳动报告匹配的差异。 入职后,请联系您的入职顾问以确认此设置的配置方式。
- 支付日字段是员工收到工资的典型工作日。这可能会根据不同的工资发放场景而变化。
- 首个支票日期是您估计运行第一次工资发放并通过Toast Payroll支付员工的日期。
- 关联的支付周期应与您的第一张支票日期相对应。仔细检查此页面,然后选择保存并继续。
- 设置将为您的工资成本(包括员工工资)提供资金的银行账户:
- 勾选此银行账户应适用的每个支付组。
- 使用支票号码字段设置自定义的起始支票号码,如果您有现有的支票号码系统。
- 使用Plaid和您的在线银行登录连接您的银行账户(选项A),或输入来自作废支票的银行信息(选项B)。
- 对于您的支票签名,在选项A中提交电子签名,或在选项B中下载、签名并重新上传文件。
- 如果您需要多个银行账户,请选择添加银行账户,然后选择保存并继续。
- 创建您自己的个人资料。Toast Payroll中的每位员工都有一个个人资料:
- 选择您是否会通过Toast Payroll收到支票。选择不,我不会有支票会移除页面下方的一些选项。
- 在基本信息中,选择您的原始雇佣日期和您的支付类型(如果您会有支票)。1099杂项支付类型允许独立承包商通过Toast Payroll获得支付和跟踪,但Toast不会为标记为1099杂项的个人报税。
- 在工作与薪酬下,选择您的主要地点和您应担任的职位角色。
- 如果您将获得薪水,请标明您是按小时支付还是固定薪资,并输入您的工资,然后选择您是否免于加班。目前,固定薪资的个人未被配置为有资格获得加班。
- 选择您所属的薪资组,然后选择 保存并继续。
- 如果您跳过了任何步骤,您可能会看到一个提示您完成这些步骤的页面。选择 前往未完成的步骤 以输入任何缺失的信息。
- 在祝贺页面上,选择 完成设置 以保存您的工作并创建您的 Toast Payroll 账户和个人资料。您的入职顾问将很快与您联系。
完成所有步骤后,您将看到一个链接到 进入 Toast Payroll 的链接,在那里您完成个人入职文书工作,然后添加您的员工。这必须在您运行第一次薪资之前完成。

预期结果:实施仪表板已完成,您的 Toast Payroll 账户和个人资料已创建,您可以进入 Toast Payroll 继续设置。
步骤 3:完成薪资设置清单
薪资设置清单指导您完成在运行第一次薪资之前需要做的所有事情。大多数步骤由您负责,部分步骤由您的实施仪表板自动完成,还有一些由您的入职顾问完成。
- 使用您在步骤 1 中创建的登录信息登录 payroll.toasttab.com。
- 当弹出窗口出现在您屏幕的右侧时,根据需要设置 是/否 选项(通常不需要),然后选择 开始。
设置清单出现在页面的右侧。只有完成实施仪表板的用户才能看到此清单。在您浏览时,请注意顶部的完成工资单设置日期。该日期是您在Toast Payroll中的第一次工资发放。如果您在该日期之前未完成清单,Toast会自动将日期移至您的下一个工资发放。
注意:如果您关闭了清单,可以通过选择Toast Payroll仪表板右上角的清单图标重新打开它。
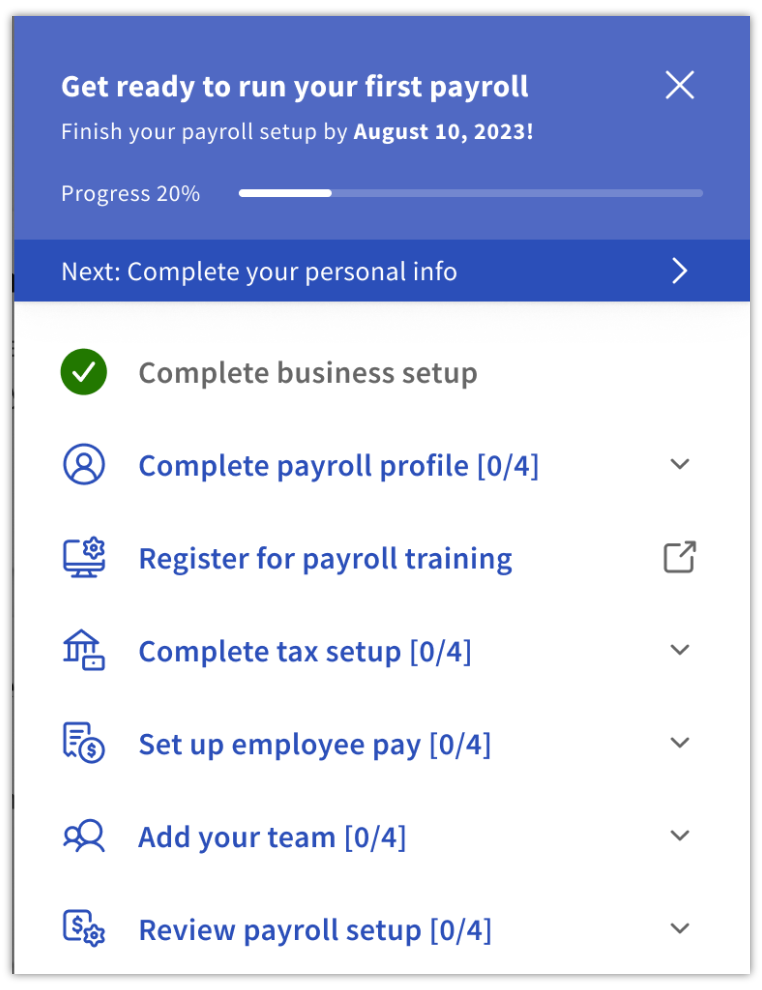
清单包括以下部分:
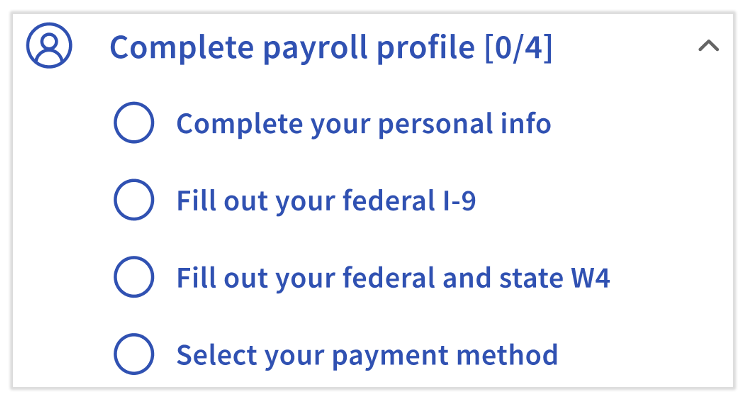
- 完成工资单资料:完成您工资单资料上的任务。选择四个任务中的每一个,以便转到正确的位置。每位员工必须提供个人信息,例如社会安全号码、I-9表格信息、W-4表格信息(联邦、州和地方适用)以及支付方式,例如直接存款。有关详细信息,请阅读Toast Payroll:获取直接存款账户的帮助。
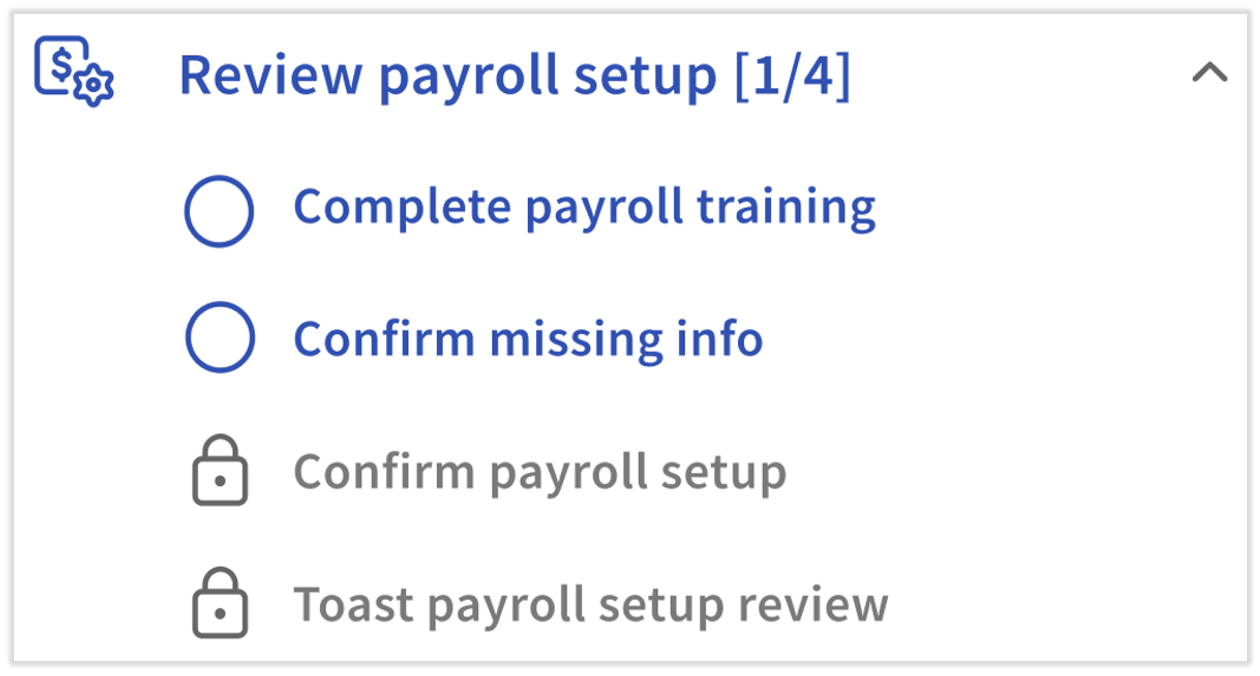
- 注册工资单培训:注册网络研讨会以了解如何设置Toast Payroll并准确运行您的第一次工资发放。
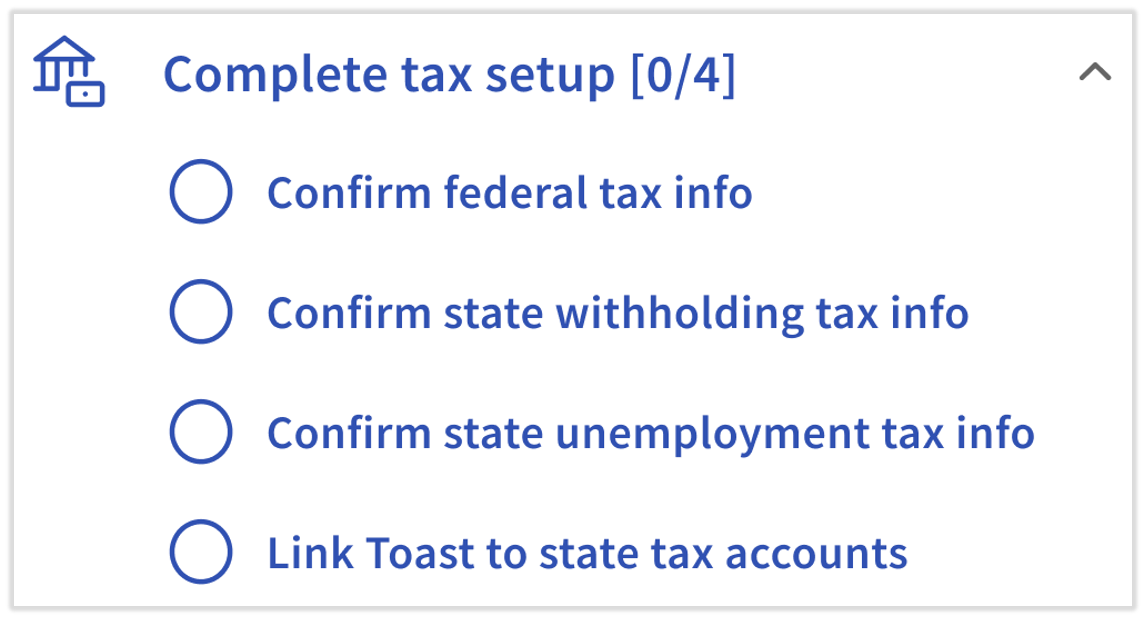
- 完成税务设置:查看您在实施仪表板中输入的税务识别数据。Toast尽快获得此信息至关重要。如果您为州失业或州预扣税账户输入了申请状态,请返回Toast Payroll中的税务账户页面,并在收到号码(以及SUTA税率或预扣支付频率)后尽快输入。如果任何税务信息不正确,请联系您的入职顾问。有关州链接的详细信息,请阅读Toast Payroll:第三方管理员链接。
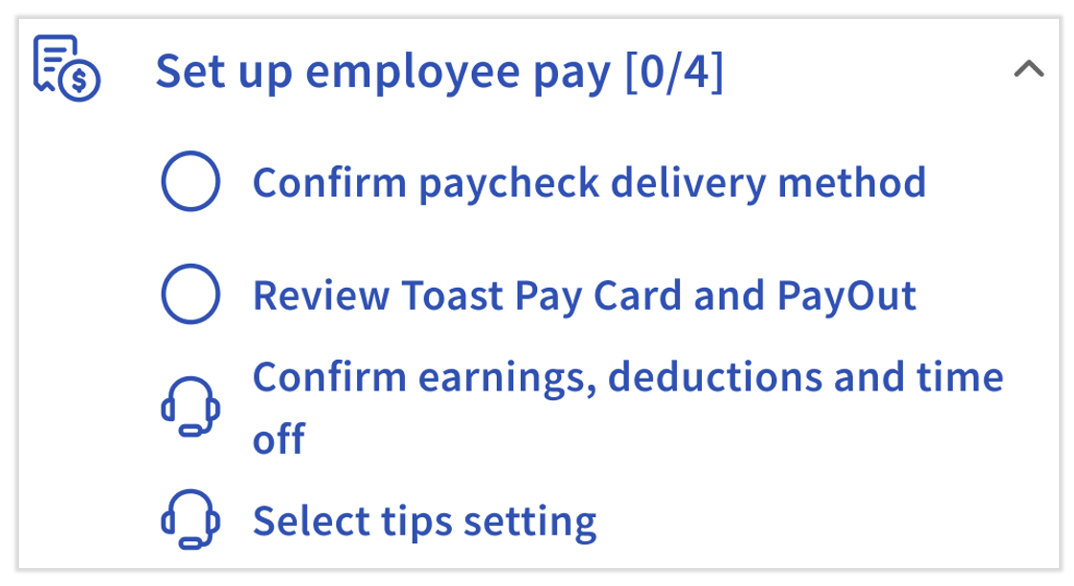
- 设置员工薪资:您负责本节中的前两个步骤:设置您的薪资发放方式和审查薪资卡选项。您的入职顾问设置收入、扣款、休假和小费。支付方式是员工个人获得薪水的方式(纸质支票、直接存款或Toast支付卡)。薪资发放是选择纸质支票方式的员工的公司范围设置,有三种选项:自打印、自书写和Toast打印。
- 添加您的团队:添加您希望员工在入职期间签署的文件,然后添加或确认您数据库中的所有职位。职位在Toast Web中添加,并在Toast Payroll中分配给员工。然后添加并邀请您的员工。
- 审查薪资设置:观看薪资培训视频以查看示例薪资运行,然后访问缺失数据页面和公司摘要页面以审查您输入的信息。您的入职顾问完成最后一步。
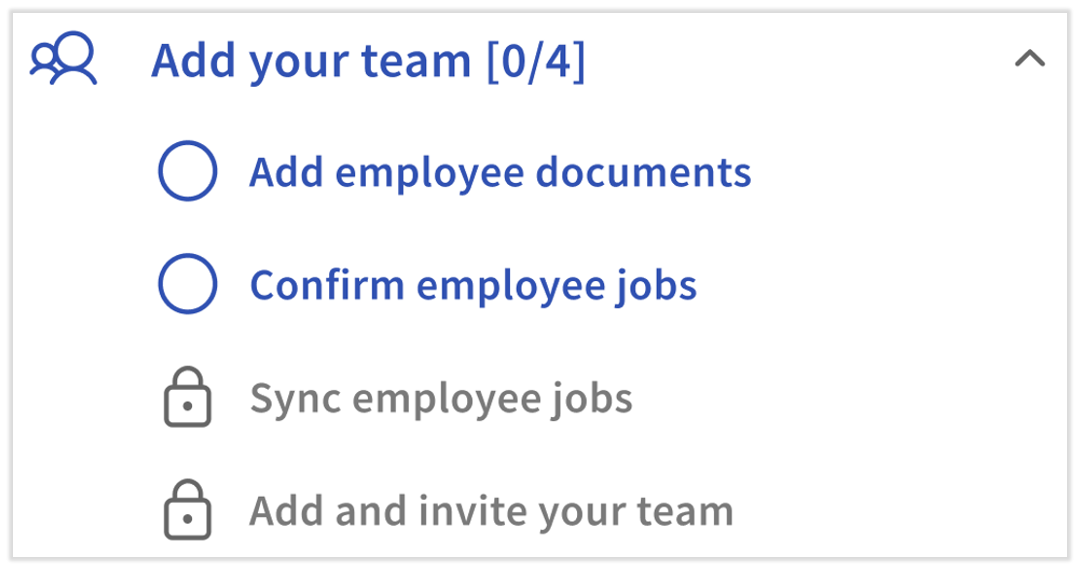
注意:在Toast Payroll中雇佣所有员工,而不是在Toast Web中。在Toast Web中雇佣员工通常会创建重复的员工档案,并导致时间表和小费同步问题。重复档案检测功能可以在即将创建重复档案时提醒您。有关详细信息,请阅读Toast Payroll:Toast中的重复档案检测。
要添加新员工,请先完成雇主步骤。然后,Toast会自动向您雇用的每位员工发送欢迎电子邮件。有关说明,请阅读Toast薪资:新员工(雇主指南),并发送Toast薪资:员工入职(员工指南)给您的员工,以便他们可以完成自己的信息。
如果您的入职顾问导入了一大批员工,这些员工将不会收到自动欢迎电子邮件。相反,从团队页面向他们发送邀请电子邮件,以便他们可以设置登录。导入的员工应遵循Toast薪资:导入的新员工指南。每位导入的员工必须验证或添加社会安全号码,完成W-4表格,并确认直接存款信息。
预期结果:每个检查清单部分都已完成或分配给您的入职顾问,您准备在检查清单顶部显示的日期运行第一次薪资。
第4步:注册Toast课堂
Toast建议所有客户注册Toast课堂,此外还观看按需培训视频。这些远程课堂式会议由Toast薪资专家主讲,涵盖预薪资维护、运行和处理薪资、薪资对账和故障排除、员工管理等内容。您可以提问并听取其他客户的类似问题。
要注册,请访问注册在线直播课程。
第5步:设置后该做什么
设置后,一些重复的任务有助于保持您的工资和税务准确:
- 如果您在季度中途更换了其他服务提供商:Toast Payroll将在两周内从您的商业银行账户中扣款,以收回季度末到期的税款。这些税款在您之前的服务提供商那里尚未提交,但确认这一点是您的责任。Toast不对因未解决此问题而导致的信用或重复扣款负责。
- 在税务中心管理您的工资税:税务中心是Toast Payroll中的一个中心,包含成功进行季度报税所需完成的任务。请经常检查并完成其任务,以提前规划并帮助防止提交修正和拒绝。要打开它,请在左侧导航中导航到税务。有关详细信息,请阅读Toast Payroll:管理工资税。
- 确认直接存款设置:在直接存款页面,导航到设置 > 工资 > 直接存款,查看哪些员工的直接存款信息不完整,并向他们发送电子邮件提醒。报告的后半部分列出了成功设置的员工。默认情况下,没有直接存款的员工将注册纸质支票方式。
相关文章
- Toast Payroll:入职和设置常见问题
- Toast Payroll:新员工(雇主指南)
- Toast Payroll:员工入职(员工指南)
- Toast Payroll:注册州税账户
- Toast Payroll:Toast中的重复档案检测
此内容仅供参考,不应视为法律、税务、人力资源或任何其他专业建议。请联系律师或其他专业人士以获取建议。